.svg)
Created by: Gunnar Tómas Gunnarsson
In this article, you will read about table actions in exMon DM. ExMon Table Actions provide the user with a simple way to store frequently used scripts or procedures relevant to the table. These scripts can then be executed by anyone editing the table data. Commonly used Actions are row validations, browser shortcuts and pushing data from exMon to other systems.
Contents:
- Create and Remove Actions
- Action Types
- Shared Customizable Features
- Exec Options Tab
- Display Options Tab
Create and Remove Actions
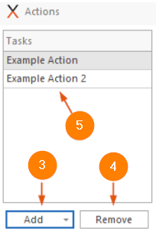
- To create an Action open the Table Designer
- Press the “Edit Action” button

- Inside the Actions form, you can simply Add actions by clicking the add button
- Or Remove Actions by clicking the remove button
- Or see a List containing all your Actions
Action Types
There are five types of Actions available in exMon:
- SQL Task: This allows users to execute SQL queries or stored procedures. A common use of this action is to validate the data that just got changed. To learn more about SQL Tasks read the SQL Task Actions in exMon DM article.
- Execute Command: This allows the user to open an email or browser. This can be used to open an underlying system with row values as parameters.
- Execute PowerShell: This allows the user to execute a PowerShell script.
- Publish Data: This allows users to move edited data from exMon to an underlying source. To learn more about Publish Data actions read the Publish Data to External Database, from exMon article.
- Execute in exMon DG: This allows the user to execute an item (e.g. queries, packages) in exMon DG. To learn more about exMon DG actions read the exMon DG Actions in exMon DM article.
Shared Customizable Features
All action types have a few shared customizable features. These include display DB name, exec options tab and the display options tab.
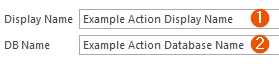
Display- & Database Name
- Display Name: If you choose to make your Action visible in the Table Editor this is the name that will appear on the Action there.
- Database Name: This name will be stored as the Action name in the Database.
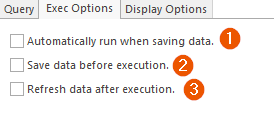
Exec Options Tab
- Automatically run when Saving Data: Check this box if you would like your Action to run every time you save your data in the Table Editor.
- Save Data before Execution: Check this box if you would like the Table Editor to save the grid changes before the Action is executed.
- Refresh Data after Execution: Check this box if you would like your data to be refreshed after the Action has been executed to see the changes.
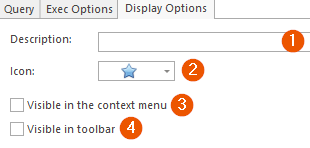
Display Options Tab
- Description: Add a description of your Action. This description will also be visible in the Actions tooltip in the Table Editor Toolbar.
- Icon: If you choose to have your Action visible in either the Context Menu or Toolbar this Icon will appear next to the Actions' Display name.
- Visible in the Context Menu: Check this box if you would like your Action to be visible in the Table Editor's Context Menu (right-click a row to see the Context Menu).
- This option allows the user to select one or many rows and right-click to execute the Action.
- When executing the action this way, IDs of selected rows can be used by the action to fx. validate only the selected rows.
- Visible in Toolbar: Check this box if you would like your Action to be visible in the Table Editor's Toolbar.
Gunnar is the author of this solution article.